From Old Yeti Mug to Candle How a DIY Project Sparked Creativity and Entrepreneurship in Kids

The project started with a lidless, scratched, well-loved Yeti mug sitting in the back of a cabinet.
It had survived road trips, soccer practices, early school mornings, and at least one mystery fall in the garage. The outside still looked sturdy, but nobody reached for it anymore. I was about to move it to the donation pile when one of my kids said, “Could we make something with it?”
That question turned into a weekend candle-making project, then a small lesson in creativity, responsibility, and business basics. What I thought would be a simple craft became one of those rare family activities where everyone stayed interested from start to finish.
Turning an old Yeti mug into a candle is practical, surprisingly beautiful, and easy enough for kids to help with under adult supervision. Even better, it gives children a real product they can imagine gifting, selling, naming, pricing, and improving.
Why an old mug makes a great candle container
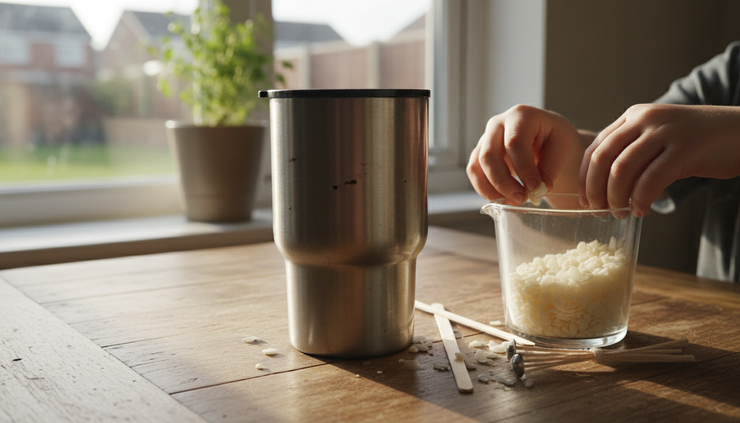
A sturdy insulated mug is made to handle heat, which makes it a fun candidate for a candle vessel when it is in good condition. The weight feels substantial, the handle makes it easy to move before lighting, and the finished candle has a cozy, reused charm that a store-bought jar does not always have.
Before using any mug, check it carefully.
Skip the project if the mug has:
Deep dents near the bottom
Cracks or holes
Loose parts
Peeling coatings inside
Plastic pieces that cannot be removed or kept away from heat
We used a stainless steel mug with a clean interior and no cracks. I washed it thoroughly, removed the old lid, and let the kids inspect it like quality control workers. They took that job seriously. One child held it up to the light. Another ran a finger around the inside and declared, “No candle leaks detected.”
That little moment mattered. They were not just “helping.” They were making decisions about whether our materials were safe and usable.
That is one of the best parts of a project like this. Kids see that making something is not random. It takes planning, checking, measuring, patience, and care.
What we used for the candle
You do not need much to make a mug candle, but having everything ready keeps the process calm. Candle wax hardens fast once it cools, so setup helps.
Here is what we gathered:
An old clean Yeti mug or other heat-safe metal mug
Soy wax flakes or another candle wax
A cotton candle wick sized for the mug opening
A wick sticker or small dot of hot glue
A wick holder, clothespin, or two pencils
A heat-safe measuring cup or pouring pitcher
A saucepan for a double boiler
Wooden stir sticks
Candle fragrance oil, optional
Candle dye, optional
A kitchen scale, helpful but not required
Paper towels or newspaper for cleanup
Labels, markers, or tags for naming the finished candle
For kids, I recommend keeping the scent simple. We let ours choose from a few family-friendly options, vanilla, orange, and cinnamon. The debate lasted longer than the wax melting.
One child wanted “campfire marshmallow.” Another wanted “orange cupcake.” We did not have either scent, so they invented a blend using what we had. It smelled warm and sweet, and they named it Saturday Kitchen because that is where we made it.
That name became the first spark of entrepreneurship. Once they named it, they started treating it like a product.
“How much would someone pay for this?”
“Can we make a holiday one?”
“What if we put a tag on the handle?”
Those questions opened the door to simple business lessons without a lecture.

How we turned the mug into a candle
This is the process we followed. Adults should handle all hot wax and stove work. Kids can measure, choose scents, decorate labels, hold the wick in place before pouring, and help with cleanup once everything is cool.
1. Clean and dry the mug
We washed the mug with warm soapy water, rinsed it well, and dried it completely. Any water left inside can interfere with the wax.
The kids helped polish the outside with a towel. That small step made the old mug feel less like clutter and more like a blank canvas.
Tip for parents: let kids be part of prep work, even if it seems ordinary. Washing, drying, and setting up supplies teaches that creative projects do not begin with the fun part. They begin with care.
2. Attach the wick to the center
We placed a wick sticker on the metal tab at the bottom of the wick and pressed it firmly into the center of the mug.
Centering matters because an off-center wick can cause uneven burning. For a wider mug, choose a wick meant for that diameter. If the mug is very wide, candle makers sometimes use more than one wick, but for a first family project, a single properly sized wick keeps things simpler.
We used two pencils resting across the top of the mug to hold the wick upright. A clothespin works too.
This step became a quick geometry lesson. My kids adjusted the wick, stepped back, squinted at it, and adjusted it again. They treated it like they were lining up a photo.
3. Measure the wax
A common beginner trick is to fill the mug with wax flakes to estimate the amount, then use about twice that volume of flakes because melted wax takes up less space. A kitchen scale gives a better measurement if you want repeatable results.
We did both. First, the kids filled the mug with flakes. Then we weighed the wax and wrote the amount down in a notebook.
That notebook turned into our “business binder.” It now holds scent ideas, cost notes, sketches for labels, and a list of people who might like a candle as a gift.
4. Melt the wax slowly
I filled a saucepan with a few inches of water and placed a heat-safe pouring cup inside to make a double boiler. Then I added the wax flakes and warmed them gently, stirring as they melted.
Adults should do this part. Hot wax can burn skin, and wax should never be left unattended on heat. Keep children at a safe distance and explain what is happening.
My kids watched the flakes shrink into a clear liquid and kept asking, “Is it ready yet?” It was a useful patience lesson. Some projects cannot be rushed, no matter how excited you are.
5. Add scent and color
Once the wax melted, we removed it from heat and let it cool slightly before adding fragrance oil. Follow the guidance that comes with your wax and fragrance oil, since different types have different recommended amounts.
We skipped dye for our first candle because the mug hid the wax color anyway. That also made the project cleaner and easier.
The kids took turns stirring. We talked about how too much scent is not better. A candle needs balance. That led to a business idea they understood right away: if a product is too strong, too messy, or too expensive to make, people may not enjoy it.
6. Pour the wax into the mug
I poured the wax slowly into the mug while the kids watched the wick to make sure it stayed centered. We left a little space at the top instead of filling it to the rim.
Then came the hardest part for everyone: waiting.
Wax needs time to set. We placed the mug on a flat surface where it would not be bumped. The kids made a “Do Not Touch” sign, which may have been their favorite part of the entire process.
7. Trim the wick and let it cure
Once the candle hardened, we trimmed the wick to about 1/4 inch. Many candles benefit from resting before the first burn, especially scented candles, so we let ours sit before testing it.
When we finally lit it, we kept it on a heat-safe surface and watched the first melt pool form. We also talked about candle safety:
Never leave a burning candle unattended
Keep it away from curtains, papers, and anything flammable
Stop using it if the container seems damaged
Keep the wick trimmed
Let adults handle lighting and extinguishing
The finished candle looked better than I expected. The old mug suddenly felt meaningful again.

How the project sparked business thinking
After the candle cooled, the kids did not move on right away. They started planning.
They wanted a name, a label, a price, and a “collection.” One candle became an imaginary product line. They drew labels on kraft paper and tied one to the handle with twine. They made scent names like Cozy Cabin Morning, Grandma’s Cookies, and Rainy Day Reading.
That is where the project shifted from craft to entrepreneurship.
They started learning business basics in a way that felt natural:
Skill | How the project taught it |
Creativity | They chose scents, colors, names, and label ideas. |
Responsibility | They cleaned supplies, followed safety rules, and waited for the candle to cure. |
Budgeting | They compared the cost of wax, wicks, labels, and containers. |
Pricing | They talked about what makes a handmade item worth buying. |
Customer thinking | They asked who would like each scent and why. |
Problem solving | They adjusted the wick, fixed label mistakes, and discussed what to improve next time. |
The pricing conversation was especially interesting. At first, one child wanted to charge a very high price because “we worked hard.” Another wanted to charge almost nothing because “it used to be an old mug.”
We talked about material cost, time, quality, and whether someone would see the mug as reused in a good way. They began to understand that price is not just a number you like. It connects to value, cost, and trust.
No worksheet could have made that lesson stick as well as a candle they made with their own hands.
Tips for parents who want to try this
A project like this works best when kids have real ownership, but adults keep the structure safe and manageable.
Give kids choices they can handle
Too many options can overwhelm everyone. Offer two or three scent choices, a few label materials, and one container. Kids still feel in charge, but the project stays focused.
Good choices include:
Picking the scent
Naming the candle
Designing the label
Choosing who to gift it to
Deciding what to improve next time
Let mistakes become part of the story
Our first label was too large. The twine slipped. A little wax dripped onto the newspaper. Nobody loved waiting for the candle to cure.
Those were not failures. They were chances to ask, “What would we do differently next time?”
That question builds resilience. It also sounds a lot like real product development, just at the kitchen table.
Keep a simple project notebook
The notebook became more valuable than I expected. It gave the kids a place to capture ideas and track what they learned.
They wrote down:
Wax amount
Scent blend
Candle name
What worked well
What to change
Possible gift recipients
Estimated cost
For older kids, this can grow into a basic profit lesson. Add up the supplies, divide by the number of candles made, then talk about a fair price. Keep it simple and age-appropriate.
Focus on gifting before selling
Selling handmade items can be exciting, but gifting is a great first step. Kids get feedback without pressure. They learn presentation, gratitude, and pride in their work.
A grandparent, teacher, neighbor, or family friend can be a perfect first “customer,” even if no money changes hands. Ask the recipient what scent they liked and how the candle looked. That feedback teaches kids to listen.
If your children do want to sell candles later, look into local rules, labeling needs, and safety expectations. Handmade candles are real products, and real products come with responsibility.
What my kids learned from one old mug
The best part of this project was not the candle, though I do love how it turned out. The best part was watching my kids see possibility in something ordinary.
They learned that old objects can have new life. They learned that making something takes planning. They learned that safety matters, details matter, and presentation matters. They also learned that business can begin with a question as simple as, “Would someone else enjoy this?”
A few days later, I found one of them checking the cabinet for more unused mugs. Another was sketching a logo for their “candle company.” They were not asking for a screen or a new toy. They were looking for materials.
That is the kind of creativity I want to encourage.

A small project with a lasting spark
Transforming an old Yeti mug into a candle gave us more than a cozy handmade item. It gave us a shared project with real steps, real decisions, and real pride at the end.
For parents, that is the bigger opportunity. Start with one forgotten object. Add a few supplies, a little patience, and room for kids to make choices. The result might be a candle, but it may also be the first time your child sees themselves as a maker, a problem solver, or even a future business owner.
The next time you clean out a cabinet, pause before tossing the odd mug. It might be the beginning of a project your kids remember long after the candle burns down.


Comments